Sunday, February 20, 2022

More Pendraken Painting Competition 2022!

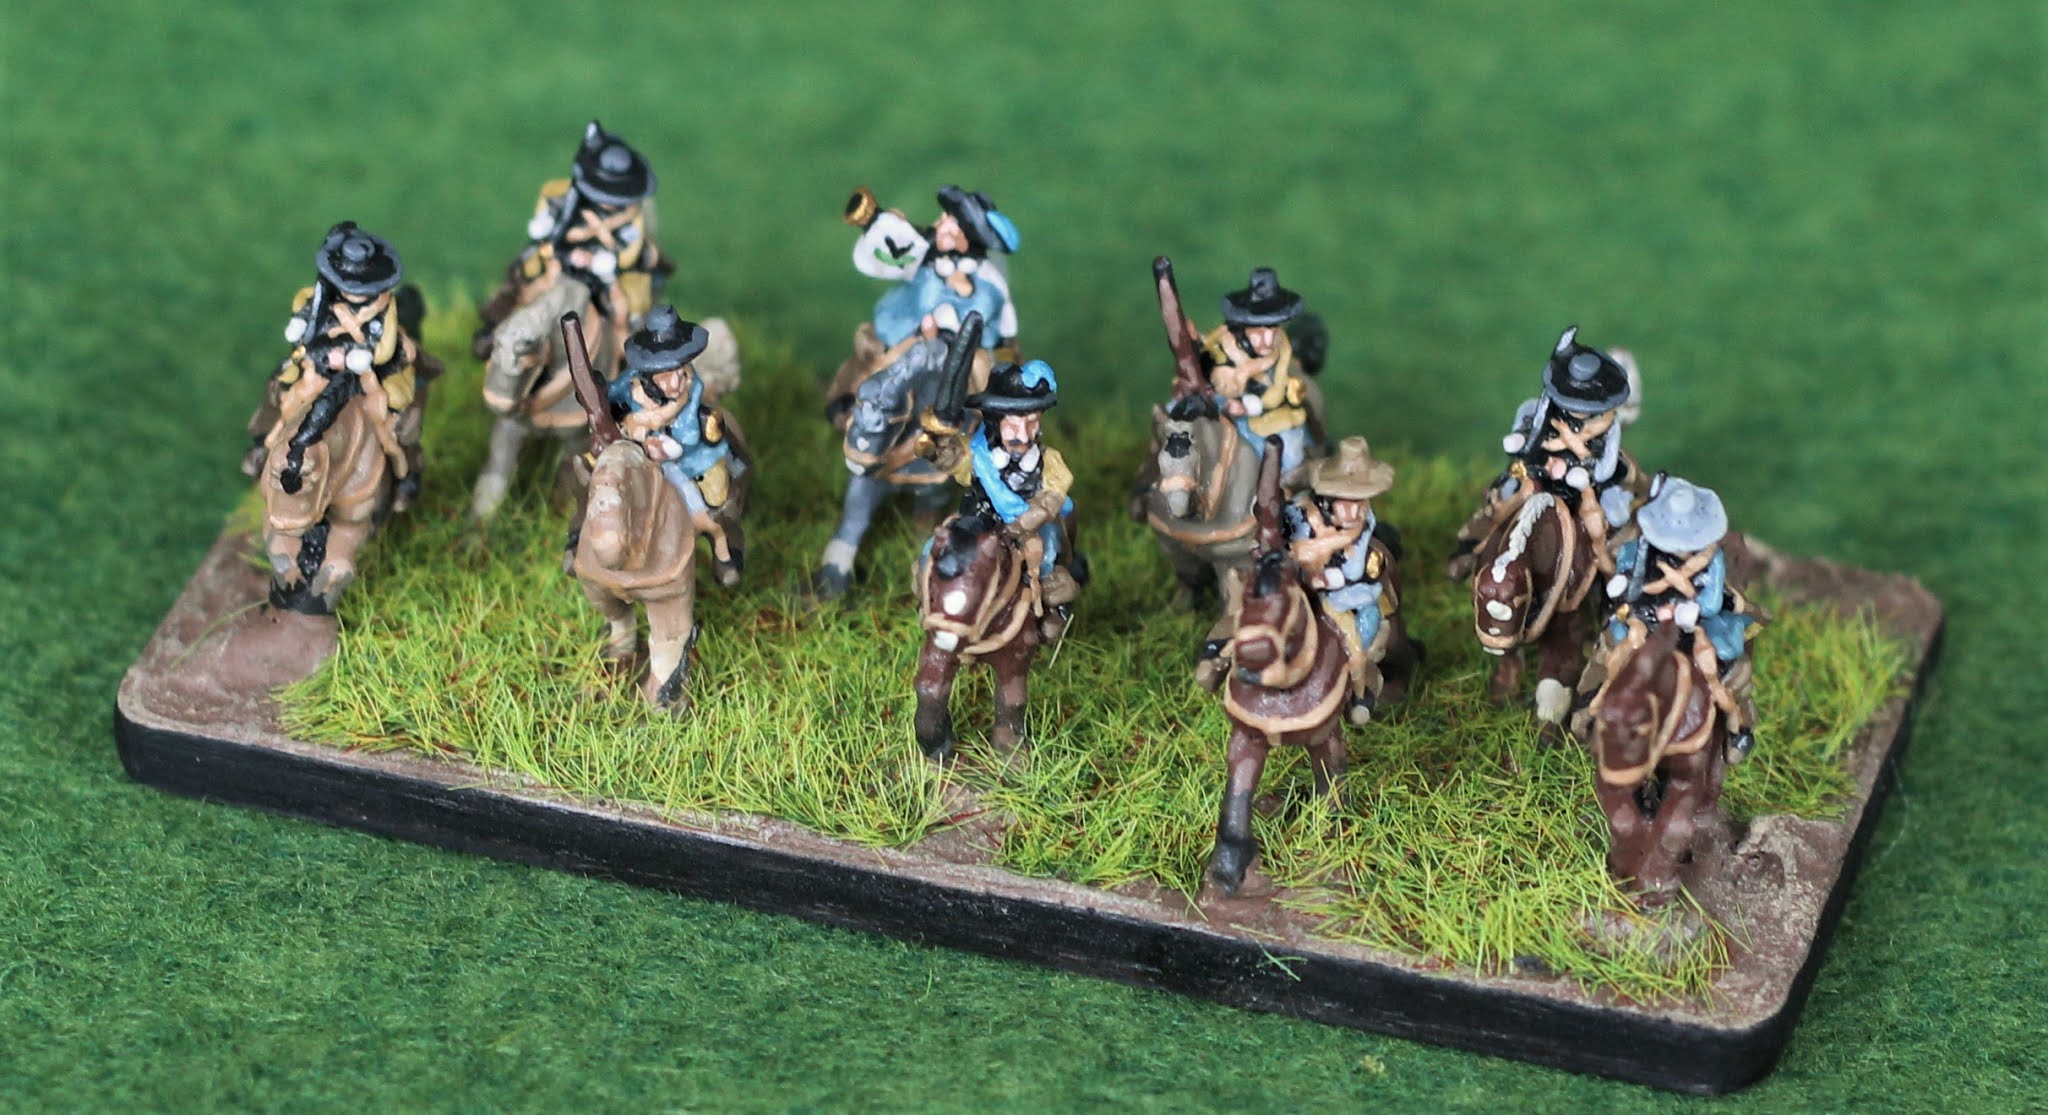
I finished painting my second unit for the Pendraken Painting Competition. This entry will be for the "Mounted" category and it depicts Grey's Horse, a rebel cavalry formation during the Monmouth Rebellion. I decided to keep to the theme of my initial entry, which was Colonel Brandt's Scythe battalion at the battle of Sedgemoor. 


Grey apparently wasn't the initial leader of Monmouth's cavalry. Grey, while brave wasn't terriblt experienced and he failed to press home his attack across the rhine on the British camp. Had he been more aggressive, who knows what would have happened. As befitting a hastily gathered rebel army, I depicted these riders in a hodgepodge of clothing and gear. There are a smattering of the purple faced red coats that Monmouth brought over with the initial invasion force.


I also decided to add some of the Falklands stuff I painted up in 2021. I painted the Argentine infantry in late 2020 and early 2021 and then tackled the British Para infantry and the vehicles in mid 2021. First up is an Argentine Panhard armored car.


Next up is a British Scimitar (or is it a Scorpion? I think its a Scimitar..). These were fun to paint, I added some antenna sourced from old toothbrush bristles. 


Lastly, I have included a British Para platoon (minus the support weapons). I have to give credit to Doug from Dougie's Wargaming Blog. He provided the roadmap on how to paint the DPM camo.


Well, that's it for now. I am currently working on my final entry for the painting competition which is none other than the Duke of Monmouth himself! Wish me luck, I only have a week left to get him done!

Saturday, February 12, 2022

Pendraken Painting Competition 2022

 Here is my entry for the Pre-20th Century Foot category, Colonel Brandt's scythe battalion at the battle of Sedgemoor. In Stephen Carter's recent work, Fighting for Liberty, the author notes that many of the scythe companies were possibly converged with the Lyme independent company to form an honor guard of sorts. Carter also notes that the "Fear Nothing But God" battle standard was recovered near where the scythe battalion would have been positioned and may have accompanied the scythes.


I tried to go with a subdued color palette to reflect the tradesmen that would have mustered into Monmouth's army. There are a few purple coats faced red mixed in to represent the coats distributed to the original rebel soldiers. There are also some red and grey militia coats sprinkled in for good measure.


I created the flag from merging several different images in MS Paint and then resizing and tweaking the contrast and brightness in MS Powerpoint. After mounting it, I had to touch it up a bit. I should say that I acquired these figures from the prizes I won in the 2015 painting competition. Last year I entered some Falklands Argentines that placed, hopefully these gents have similar success! I hope to paint and enter some additional entries before the deadline. Wish me luck!


Monday, September 20, 2021

Cannon, Cross and Crescent Play Test

I finished up my initial 1/2400 Tumbling Dice renaissance galley Turkish and Christian fleets so I decided to play a very small play test of David Manley's Cannon, Cross and Crescent ("CCC") quickplay rules for the period. 

A little about CCC. They are, as mentioned, quickplay and have some DBx feel to them. Ships have factors for heavy and light guns, boarding, stoutness, movement and turning ability (there are a few others). Different types (and nationalities) of ships have different values for these factors to reflect how the ships were constructed and how their peoples like to fight. 

Heavy guns have a 6" range and light guns 3". Light guns have a much wider arc of fire however. Shooting combat is straight forward: roll a dice, add your gunnery factor and any other modifiers and your opponent rolls a dice and adds it to his ship's stoutness factor. If you win small, expect some damage or crew casualties. If you win big, you may wreck your opponent outright. Boarding is similar: get stuck in, roll to attempt boarding (anything but a "1" is good to go), roll dice and compare boarding factors and modifiers. 

A turn is comprised of a command phase where you attempt to make repairs and check morale among other things which is followed by a series of action phases (3 action phases per side). You determine which side's action phase it is by drawing a card. I opted for a randomly drawn colored die (I had three red dice for the Turks and three white dice for the Spanish). This creates some additional uncertainty from the normal IGO/UGO system.

Here is the Turkish fleet comprising of three light galleys and one regular galley (2nd from bottom), the Turkish fleet is also accompanied by four bases of small boats. In the CCC rules, these can tag along to the big ships and add their manpower to boarding actions. The Turks are already fairly powerful with boarding actions as it is, so you know what they will want to do...

The Christian fleet, comprising of two galleys and two light galleys. For today's game I opted to make them Spanish. The Spanish are strong in boarding and have good firepower for their light guns. The light galleys don't have heavy guns however...no small boats for the Spanish since they have two regular size galleys in this fight.

Here is the relative dispositions of the fleets looking from the Spanish side of the table.

No real tactics will be on display for this play test, Don Juan and Barbarossa are probably very disappointed in the simple scrum planned. The fleets close in to each other...

The fleets close in on each other. At this point you may notice little white beads on the starboard bows of the center Spanish galleys and a black bead on the port stern of the Turkish galley. Let me explain...in CCC, you will want to denote a few situations/status of ships: who has fired heavy guns, which ships have suffered crew casualties (halving your boarding factor) and which ships have suffered damage (halving both boarding and gunnery factors). To keep bookkeeping to a minimum, I have small pegs inserted onto 3 of the 4 corners of the ship base. I place a small plastic Perler bead on these pegs to show status. The white pegs show the Spanish galleys have fired their large guns and one of those salvoes damaged the Turkish galley (black bead).

The fleets have come to grips with each other. The Turks closed in and were successful in boarding attempts on three of the four attempts (the light galleys on the far right came close but didn't make contact). The Spanish light galley on the far left has suffered damage when the Turks fired their heavy guns on contact.

Based on the prevalence of the yellow beads, you know something has happened! The yellow beads indicate crew casualties. If you notice the Spanish light galley has been replaced by a near sinking wreck. From what I recall, they were previously damaged and had crew casualties. They took a second crew casualty which turns to a damage but since they were already damaged, they became a wreck!

The beginning of the 2nd turn saw the end of the battle. Three compromised Turkish ships ganged up on the left Spanish galley, damaging it and inflicting crew casualties. On the right , the remaining Spanish light galley was captured when it was finally boarded by the Turkish light galley who then backed up and fired its heavy guns into the right Spanish galley. 

With both of their light galleys lost and the remaining galleys damaged along with crew casualties, I decided to call the battle and declare the Turks the winners. The Turkish fleet lost two bases on small boats but that's it... The game only lasted a turn and a half and went for about 30 or so minutes.

I'm sure I did some things wrong but I still had a blast. I will reread through the rules and run another play test. I highly recommend these for simple but nuanced renaissance galley combat.


Monday, September 6, 2021

Five Core Company Command Play Test

My good friend and fellow gamer messaged me today mentioning he was gaming some 40K with his son. Since it was a holiday, the message inspired me to break out my 10mm Falklands' forces for a quick playthrough of Five Core's Company Command rules. I hadn't read through the rules to acquaint myself before the game so I'd have to muddle through. Here are some quick snaps to give an idea of how the game went...

I grabbed a 24" square DBA game mat and placed quite a bit of terrain on it. Smaller than ideal but it fir my table. I gave the British Paras (bottom of table) three platoons and some leaders. The Argentine defenders had a single entrenched platoon on a hill and a .50 caliber HMG detachment providing support on a smaller hill to their right.

I played the "fog of war" turn mechanism. At the beginning of the turn, roll a D6. A 1 provides a scurry turn, 2-5 a normal turn allowing each side to activate 3 bases, and a 6 sparks off a firefight. The first turn I rolled a one, allowing the British to advance 6" towards cover. 

The British were able to initiate a dash, which is a bonus move of D6 to get to an intended location. This allowed the British to really close the distance before the Argentines could unload.

The next turn saw a roll of a two, and the Argentine forces disposed of their hidden status and opened up with two infantry sections and the HMG detachment. The .50 caliber drove back one Para section while an Argentine infantry section was able to induce panic in a British section which then bolted for cover.

The British portion of the turn saw their left flank close assault the Argentine HMG, knocking it out of action. I incorrectly moved the rest of the British bases allowing them to close the distance with the remaining entrenched Argentines. The British assaulted some of the Argentine trenches but were repulsed.

The following turn I rolled a six, which set off a firefight. The British enfiladed the outflanked Argentine section and silenced it (blue star). The Argentine defenders exacted their revenge but eliminating two Para sections (red stars). 

The following two turns saw the British paras mass fire on the remaining Argentine sections which were ultimately silenced.

I definitely did some things wrong. I need to go through the rules and see what I did right, what I did wrong and digest the mechanics a bit. I'm a little uncertain about shooting. You need line of sight, if you are firing over an obstacle you only use shock dice ( I image this would apply if you are on higher ground and there is some rough terrain between you and your target that doesn't block line of sight). If your target is in the clear and wide open, you add an extra kill die to your shooting roll (fairly obvious). The thing that confuses me is what exactly constitutes "normal" unmodified shooting. Is it when your opponent is in terrain but not hiding? When they are behind terrain and the full base isn't in the clear but you have LOS? I think the Falklands pose a challenge because so much of the battlefield will be "in the clear"....maybe need to add some high grass and gorse terrain to my tabletop...

After I read through again, I will try it out with a bigger mat and/or some more open ground to make the British advance a but more dangerous.  I really enjoyed it, about 4-5 turns and roughly 30 minutes gave me a decisive conclusion. 


Friday, June 25, 2021

Blitz Bowl Dwarves

 Here's something a little different...

I am normally a historical wargaming enthusiast but do venture into sci-fi and fantasy. My early gaming was mostly GW products in the early 90s. I always liked the idea of Blood Bowl but not enough to commit to the game, the teams were too big and the games were a little too involved for my taste.

Enter Blitz Bowl, which I just recently learned of...it is a bite size, quickplay variant of the game with much different concepts and mechanics. I went over to a local Barnes and Noble and picked up the box set then proceeded to order some additional teams online, thru my FLGS and some extras (decals, a troll, etc) via eBay.


The first team I tackled were the Dwarfs. I originally intended to use the teams as a way to practice my use of contrast paints. The plan was to paint them quick at wargamer standard and get them ready to play. I decided on a grey, green and gold color scheme (accented with red gems) and tried out the $100 worth of contrast paints I purchased. I decided I didn't like them for this project. 

Instead, I opted for a basic paint job spruced up with inks and washes and the very rare highlight. I added uniform numbers from some 2nd hand decals purchased off of eBay (Blitz Bowl teams don't come with decals).


Here's the Troll Slayer. It was my first miniature I painted for the team. Very basic stuff. I used GW Astro-Granite for the base effects. I also added tiny magnets to the bases and the footballs to aid in gameplay.


The entire 6 player team. Took me a little less than a week to paint and most of that was trying to figure out the approach to painting them. Next up are Humans and after that there are Chaos, Halflings, Skaven, Undead and did I mention Goblins with a troll.....


Friday, June 11, 2021

10mm British Paras for Falklands

Just completed my first British Para platoon. Each base is a section and the platoon will have some attachments (additional LMGs, snipers, etc) and the company of three platoons will have some heavy weapon support (MILAN teams, HMGs, etc). The figures are Pendraken and are based for Nordic Weasel's FiveCore Company Command. 

Here is the platoon in front of a Time Cast rocky outcrop. I flocked the scenery and game mat to match the yellowish static grass. The tint in some of these pictures is a bit more green than the actuality.

Closeup of a base that has an officer directing his section. The British Paras presented a unique challenge because I needed to paint British DPM on a 10mm scale. I would have been lost without the guidance of Dougie's Wargaming Blog, Doug has a great tutorial on how to paint and base these same figures and he has alot of knowledge of the Falklands conflict.

A different base with an LMG team (guys in berets).

The full platoon again.


Rearview of a section. You can get a better look at the DPM camo. Overall I am happy with how these guys turned out. I still have two more platoons to paint as well as some attachments and support weapons. Look forward to getting everything done and all the gaming table!


Saturday, May 29, 2021

Protestant Union Army

I started my 10mm TYW project sometime last year in the late spring or early summer. I had purchased the initial figures for it during Cold Wars 2020, the final HMGS convention before the pandemic shut everything down. Over the course of the pandemic, this was my chief project. It is fitting that I finally completed both armies as things begin to open up again. I am proud that I stuck through and finished both armies for Fleurus. The Protestant cavalry was a real grind to get through. 

The full army: 6 infantry brigades, 11 cavalry brigades, 2 artillery batteries and 3 commanders.

Group shot of the 6 infantry brigades. Mansfeld, commander of the Protestant army, supposedly had brigades of infantry named after colors (red, blue, green, yellow). Even though this was a reference to flags, I decided to paint the brigades in corresponding uniform colors.

"Yellow" brigade.

One of three "Blue" brigades, in this instance it is Mansfeld's foot guards bearing one of his known flags.

"Red" brigade in a brick red tone.

"Green" brigade.

All eleven cavalry brigades, these fellas were a real grind to finish. I really got fatigued painting cavalry midway through. The Protestant cavalry didn't really perform well in the battle. There are accounts of them being fine German cuiiassiers and also of being mutinous rabble. I went with a mix of these two.

Some fine German cuirassiers in an orange color, I painted this unit to be Christian the Younger's personal brigade.

Another brigade of cuirassiers, this time Von Streiff's personal unit showing off his livery and the black bird emblem.

Some of the less well equipped horse, maybe these are mutinous rabble...


Perhaps more rabble. These are a mix of Old Glory and Pendraken.

Artillery.

The Protestant commanders (L-R): Von Streiff, Mansfeld, Christian the Younger of Brunswick

Last but not least, the Imperial baggage train. During the battle, the baggage played a role slowing down the Protestant cavalry attack. Here they are...